Comfort food doesn’t always need to mean heavy sauces, loads of butter, and excessive calories. This One-Pot Garlic Parmesan Chicken and Rice completely flips the script, delivering all the rich, creamy, and savory satisfaction of a traditional risotto but with a powerful, healthy twist. If you’re looking for a meal that satisfies your cravings while aligning with your wellness goals—whether that means high-volume eating, balanced nutrition, or a hearty, satisfying dinner—you’ve found it.
In this recipe, we’re utilizing a simple, time-tested strategy: making the dish High Protein and focusing on high-volume techniques. The creamy texture isn’t achieved with heavy cream or extra cheese; instead, we maximize the creaminess of high-quality brown rice (which adds significant fiber) and use lean chicken breast and Greek yogurt (for a protein boost that rivals a protein shake) to create a velvety, luxurious sauce. It’s comforting, satisfying, and shockingly light. Best of all, it all cooks in one pot, which means easy cleanup and a completely stress-free cooking experience. This is the recipe that proves you can have your risotto and eat it too.
We’ve designed this One-Pot Garlic Parmesan Chicken and Rice to be a staple in your rotation. The blend of slow-roasted garlic and rich parmesan cheese creates a depth of flavor that usually takes hours of slow simmering, but this version comes together in about 45 minutes of mostly hands-off time. It’s perfect for busy weeknights, meal prep, and a family dinner that feels special. This is comfort food, reinvented for your healthiest self.
Understanding the Healthy, One-Pot Risotto Alternative
Traditional risotto is known for its creamy consistency, which often comes from the unique starch of Arborio rice and generous additions of butter and cheese. Our Healthy One-Pot Garlic Parmesan Chicken and Rice uses a different method. We are not making a risotto in the technical sense; we aren’t constantly stirring to release starch.
Instead, we are making a one-pot creamy rice dish. We rely on several key techniques to mimic that rich texture:
- Brown Rice (The Foundation): We’ve chosen high-quality, long-grain brown rice. While it takes longer to cook than white rice, it provides significantly more fiber and nutrients. It also retains a delightful al dente chew that keeps the dish from turning to mush. As it simmers in the broth, some of its starch is still released, naturally thickening the liquid.
- Lean Protein Boost: We are using lean, boneless, skinless chicken breast. It’s exceptionally high in protein, which is key for satiety and muscle health. Sautéing it quickly before adding the other ingredients helps lock in flavor. This high-protein focus also makes the meal more substantial, keeping you full for longer.
- The Creamy Secret (Greek Yogurt): This is the game-changer. Instead of adding large amounts of high-fat heavy cream or loads of parmesan, we stir in a generous dollop of plain, non-fat or low-fat Greek yogurt at the very end of the cooking process. This instantly transforms the dish, creating a silky-smooth, tangy, and rich sauce with zero added fat and a massive protein punch. It’s the ultimate healthy comfort food hack.
- Flavor Building Blocks: The foundation of the flavor comes from a lot of garlic and savory onion. We toast the garlic first to unlock its sweet and nutty notes. A moderate amount of sharp, aged parmesan cheese provides that signature savory, umami flavor. To elevate it further, we include hints of thyme and a splash of lemon juice to cut through the richness and brighten up every bite.
By using these elements, we create a recipe that feels indulgent but is actually packed with nutritional benefits, aligning perfectly with goals like weight management, muscle support, and balanced eating. This is truly a “smart comfort” dish.
Setting Up Your Kitchen: The Ultimate One-Pot Workflow
The beauty of a one-pot meal is the efficiency, but to fully embrace the stress-free nature of this dish, it’s essential to set up your workflow before you begin. A clean station and thoughtful mise en place (French for “everything in its place”) will make the cooking process glide smoothly.
Before you start, select your equipment. You’ll need a large, heavy-bottomed pot or Dutch oven (the heavy bottom prevents the rice from scorching) that has a tight-fitting lid. Also, grab a sharp chef’s knife, a large cutting board, a whisk or mixing spoon, and your measuring spoons and cups.
Creating this dish is as simple as layering flavor and following a precise sequence. It starts with a flat lay, where all your raw elements are organized.

The composition of ingredients for this healthy one-pot meal is simple and visually appealing:
- Lean Protein: Cubed chicken breast.
- The Grain: Brown rice (which we chosen for texture and fiber, but white rice can work with reduced cooking time).
- The Creaminess: Freshly grated Parmesan cheese and non-fat plain Greek yogurt.
- The Aromatics: A substantial quantity of fresh garlic and yellow onion.
- The Liquid: Low-sodium chicken broth (to keep sodium levels down).
- The Flavor Finishers: Fresh thyme, lemon juice, fresh parsley, and olive oil (for minimal sautéing).
Step-by-Step Instructions: Mastering the One-Pot Meal
We are ready to move from the ingredient stage into active preparation and cooking. This method is all about building layers of flavor while keeping everything in the same pan. If you follow these sequential steps, your final dish will have a depth and richness that is usually reserved for complex, slow-cooked meals.
The success of any one-pot meal relies on texture timing. You don’t want your vegetables to overcook while your rice is still hard, nor do you want your chicken to become rubbery. We prevent this with a specific sequence: brown the chicken quickly for flavor, remove it to prevent overcooking, build the aromatic base, toast the rice, and then let everything simmer.
First, let’s move to the cutting board and get the active chopping done.
Image 3: The Art of Preparation
This is where the magic starts: transformation of raw ingredients through careful prep. With our mise en place complete (as seen above), we move directly to action. Using a sharp knife and a sturdy board, we focus on cutting and measuring.
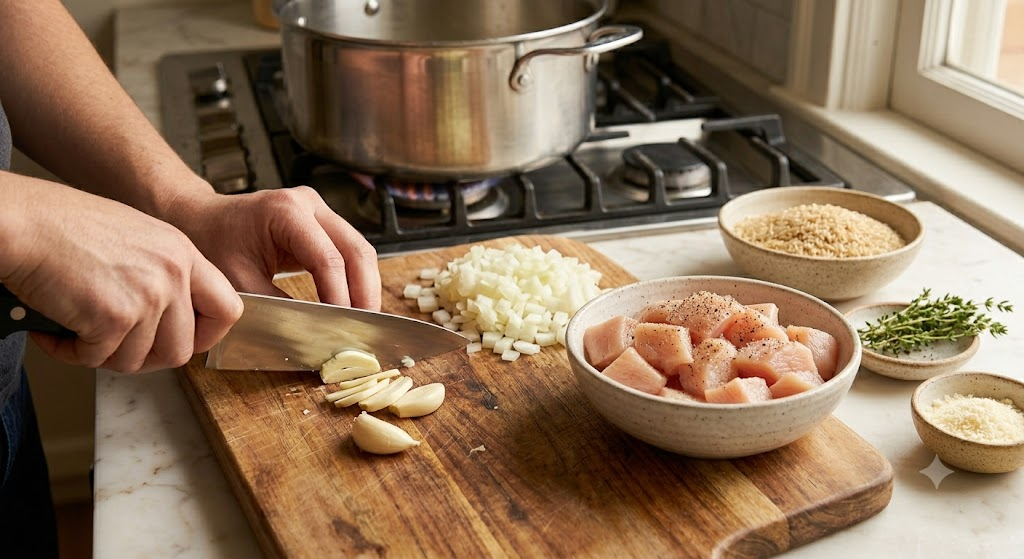
Image 3: Prep Ingredients (Visualizing Step 1)A high-resolution shot captures the essential chopping phase. On the dark rustic cutting board, a chef’s knife expertly slivers fresh garlic cloves. The yellow onion is already diced into uniform pieces. A ceramic bowl holds the cubed chicken breast (the key high-protein element), waiting to be seasoned. In the background, on the stovetop, our large Dutch oven is already heating, showing the steam that is about to meet these fresh ingredients.
Step 1: Prep and Sear the Chicken
Start by preparing all your ingredients as shown in the preparation image (Image 3). This is crucial for a smooth workflow. Chop the onion, sliver the garlic, and cut the chicken breast into even, bite-sized pieces.
Pat the chicken pieces very dry with a paper towel. This ensures a good sear, which creates flavor. Season the chicken liberally with salt and black pepper.
Heat 1 tablespoon of olive oil in your large Dutch oven or heavy-bottomed pot over medium-high heat. Once the oil is shimmering, add the chicken in a single layer (do this in batches if necessary so you don’t overcrowd the pan). Sear the chicken for 2-3 minutes per side, until it develops a nice golden-brown crust. It does not need to be cooked through at this stage. We remove it now so it stays tender while the rice cooks.
Transfer the seared chicken to a clean plate and set it aside. Tip: Searing builds complex flavors (the Maillard reaction) that will ultimately season the rice and the broth.
Step 2: Build the Aromatic Base
Reduce the heat under the pot to medium. If the pan looks very dry, you can add another small splash (½ teaspoon) of olive oil. Add the finely diced yellow onion. Sauté the onion for 5-7 minutes, stirring occasionally, until it is soft, translucent, and just beginning to turn golden.
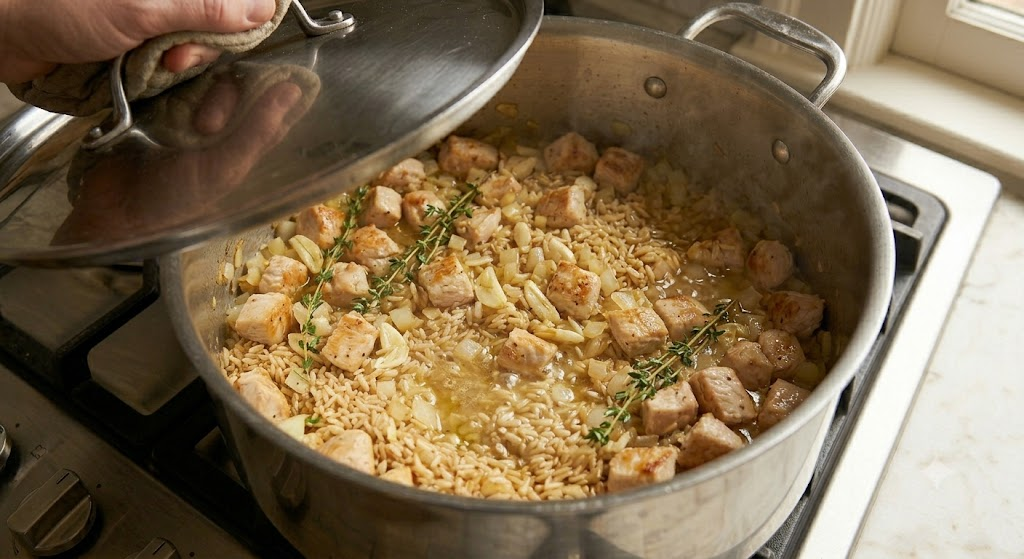
Next, add the star aromatic: the slivered garlic (image 1). This recipe uses a lot of garlic, which provides profound flavor and anti-inflammatory benefits. Sauté the garlic and onion together for just 60-90 seconds, stirring constantly so the garlic doesn’t burn (burnt garlic is bitter). You will immediately smell the incredible aroma. Stir in the fresh thyme sprigs and a final pinch of black pepper.
Image 4: The Rice Toasting and Initial Sauté
Now we arrive at the pivotal moment where the raw rice meets the aromatic base. This step, common in risotto-making, is crucial for color, flavor, and texture.
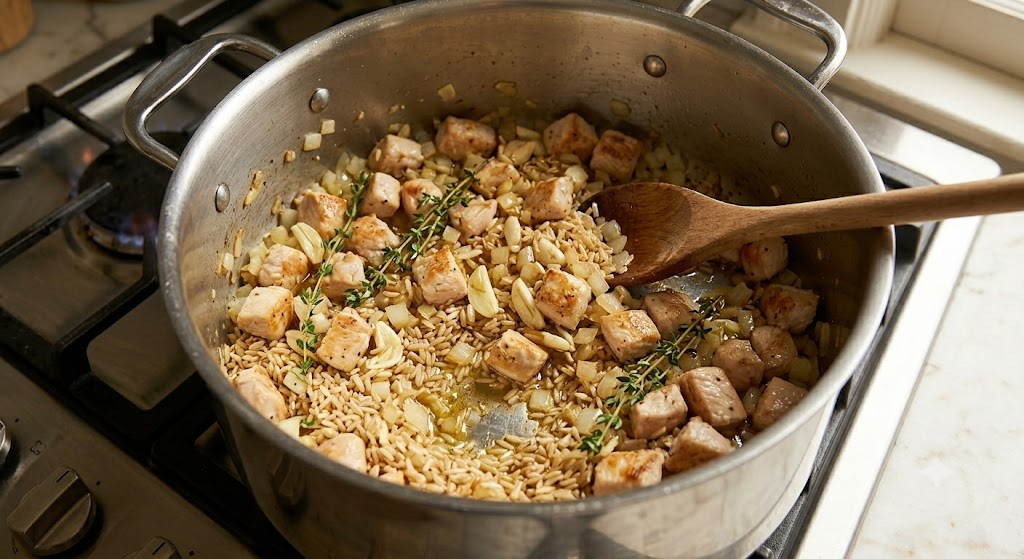
Step 3: Toast the Rice and Sauté
(As visualized in Image 4): While the aromatics (onion and garlic) are perfectly sizzling, pour the uncooked long-grain brown rice directly into the center of the pot.
Stir the rice constantly with a wooden spoon, making sure it gets well-coated in the garlic-infused olive oil and the flavorful browned bits (fond) from the chicken. Toast the rice like this for 2-3 minutes. This toasting process cracks the exterior of the grain, creating a nuttier flavor, ensuring the rice absorbs the liquid beautifully, and prevents it from turning to mush later. You will notice the rice begins to smell slightly nutty and looks glossy.
Note: In image 2, you are seeing the moment the dry rice is introduced to the pan where the seared chicken is being held momentarily. In our refined method, we recommend searing the chicken and removing it first, then adding it back only after the rice has toasted, to ensure the protein stays tender.
Step 4: Add Liquids and Simmer
(Immediately after Step 3): Increase the heat to high. Pour in the low-sodium chicken broth, scraping up any delicious browned bits that are stuck to the bottom of the pot. This is called “deglazing,” and it adds significant flavor.
Add the seared chicken (along with any juices that collected on the plate) back into the pot with the rice and aromatics. Stir everything until it is well combined.
Bring the mixture to a robust boil. As soon as it boils, reduce the heat to low (making sure it’s a gentle, steady simmer—not a vigorous boil). Immediately cover the pot with a tight-fitting lid.
Set your timer and do not lift the lid. For long-grain brown rice, this simmer time will be 35 to 45 minutes (check your rice package instructions). The rice must absorb the liquid and cook entirely with steam.
Image 5: The Midway Point: Checking Texture and Volume
This is a rarely seen moment in a recipe—the critical midway check. The active boiling has stopped, and the steam has been doing its work. Lifting the lid reveals a significant transformation.
Step 5: The Vital Texture Check (As Seen in Image 5)
When your timer goes off (around 35-40 minutes), lift the lid briefly. Use a fork to pull back a small section of the rice from the center of the pot. Refer to image 3 to see the visual texture of this moment.
- If the liquid is absorbed and the rice is tender: You are ready for the next step.
- If the rice is still hard/crunchy, but all the liquid is absorbed: Add another 1/4 cup of hot chicken broth (or water), cover the pot tightly again, and cook for another 5-7 minutes on very low heat.
- If there is still significant standing liquid: Cover and continue simmering for 5-10 minutes. The brown rice must absorb the liquid to become tender and voluminous.
Once the texture is right, proceed to the final step.
Step 6: Make it Creamy and Finish
Remove the pot from the heat. This prevents the Greek yogurt from curdling. Carefully remove and discard the now-wilted sprigs of fresh thyme.
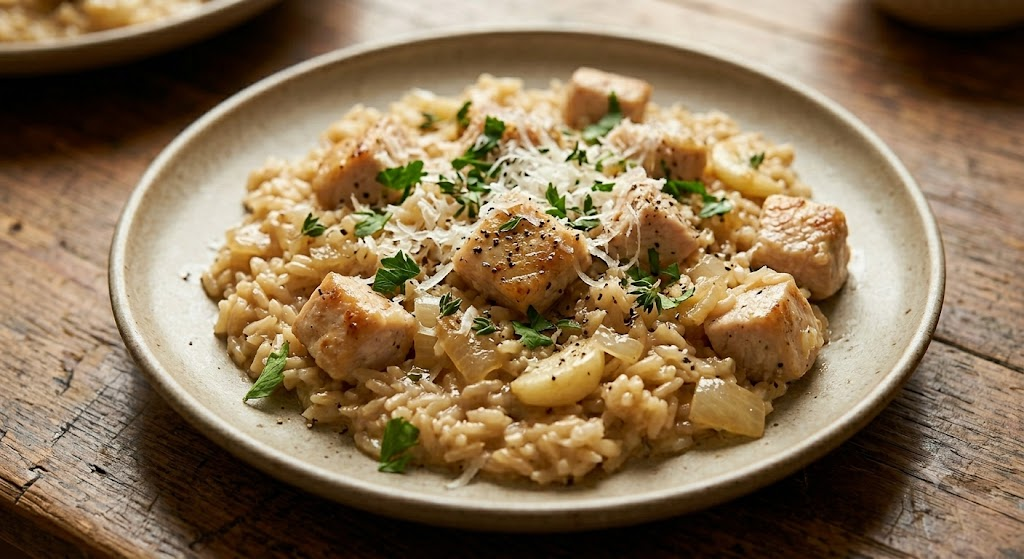
Add the two key finishing ingredients: the freshly grated Parmesan cheese (from image 0) and the dollop of plain non-fat Greek yogurt (the protein-boosting “creamy secret”). Immediately use a spoon to fold them into the hot rice and chicken mixture. The residual heat of the dish will melt the cheese and transform the yogurt into a silky, luxurious sauce.
Add the fresh lemon juice and the freshly chopped parsley (image 0). Fold once more to ensure everything is evenly incorporated. The lemon juice and parsley cut through the richness, brightening all the garlic and cheese flavors. Taste and adjust seasoning if needed (a final pinch of salt can make the garlic pop).
Serve immediately, garnished with an extra sprinkle of parmesan and black pepper.
Tips for Healthy One-Pot Success and Customization
This One-Pot Garlic Parmesan Chicken and Rice is highly versatile, designed to work for a wide range of nutritional priorities and dietary preferences. Here’s how you can make it your own:
1. Prioritizing High Protein & Volume (The Core Recipe)
Our core recipe, as written, is already optimized for High Protein (using lean chicken breast and Greek yogurt) and High Volume (maximizing the expansion of fiber-rich brown rice and using broth, not cream). A typical portion of this meal is very large but remains surprisingly low in calories, making it exceptionally satisfying.
2. Mastering Vegetable Integration
To make this dish even higher-volume and increase the fiber (which supports High Fiber goals), load it with vegetables. The secret is knowing when to add them so they don’t turn to mush during the long rice simmer.
- With the Aromatics (Step 2): Heartier vegetables like diced celery, bell peppers, or sliced mushrooms can be sautéed right alongside the onion.
- In the Last 5 Minutes (Step 5): Stir in delicate greens like baby spinach, chopped kale, or small broccoli florets (zapped in the microwave for 1 minute first) during the final texture check, letting them steam as the rice finishes.
- Frozen Peas: My favorite hack. Stir in 1 cup of frozen peas at the very end when you add the Greek yogurt and cheese; the heat of the rice will defrost and warm them instantly, keeping them vibrant and popped.
3. Low Carb and Keto Adaptations
To make this a Low Carb or Keto-friendly One-Pot meal, you must replace the brown rice, which is a complex carbohydrate. The best substitution is Cauliflower Rice.
- Method: Sauté 4-5 cups of cauliflower rice (fresh or frozen) along with the aromatics in Step 2 until it’s soft. You do not need to add the 4 cups of chicken broth. Instead, cook the cauliflower rice in only about ½ cup of broth to create steam. Then, because cauliflower rice cooks quickly, return the cooked chicken, add the lemon juice and thyme, and proceed to the creamy finishing step (Greek yogurt and Parmesan) much sooner.
4. Gluten-Free and Vegan Options
- Gluten-Free: This entire recipe is inherently gluten-free, provided you verify that your chicken broth is certified gluten-free.
- Vegan/Plant-Based: This requires replacing both the protein and the dairy.
- The Protein: Instead of chicken, use 2 cans of chickpeas (rinsed and drained) or 1 block of super-firm tofu (cubed). Add these in Step 2.
- The Creaminess: Skip the Greek yogurt and the Parmesan cheese. Instead, stir in 1 cup of full-fat coconut milk (for richness) and ¼ cup of nutritional yeast (for savory, cheesy flavor) in the final step. The resulting texture will be similar to our creamy visual in Image 5, with a delightful dairy-free tang.
5. Efficient Meal Prep
This dish is a Meal Prep Rockstar. The flavors deepen and meld even more as it sits.
- Storage: Portion the cooled finished dish into airtight glass containers. It will last in the refrigerator for up to 4 days.
- Reheating: To maintain that creamy texture, reheat gently. Add a splash of water or broth to the portion before microwaving, then stir well. The Greek yogurt sauce will reconstitute beautifully.
Why This is “Smart Comfort” Food
This One-Pot Garlic Parmesan Chicken and Rice embodies everything we love about smart, healthy cooking. It’s comforting, satisfying, and flavor-packed, but the nutritional profile has been thoughtfully re-engineered to be High Protein, High Volume, and filled with fiber and nutrient-dense ingredients. We’ve used techniques like toasting the rice and building layers of flavor (the sear, the aromatic base, the lemon finish) to create complex tastes with minimal effort. This is the recipe that proves you can enjoy your favorite creamy comfort foods while nourishing your body and achieving your wellness goals. It’s the ultimate kitchen win-win.
Recipe Card: One-Pot Garlic Parmesan Chicken and Rice
- Yields: 4 large servings
- Prep time: 15 minutes
- Cook time: 50 minutes (total, including simmering time)
- Nutritional Highlights: High Protein, High Volume, High Fiber (if using brown rice), Low Fat.
Ingredients:
- 1 tablespoon olive oil, divided
- 1 lb (450g) boneless, skinless chicken breasts, pat dry and cut into 1-inch (2.5 cm) cubes
- ¾ teaspoon sea salt, divided
- ½ teaspoon ground black pepper
- 1 medium yellow onion, finely diced
- 6 cloves garlic, thinly slivered (about 2 tablespoons)
- 1½ cups (270g) uncooked long-grain brown rice (Note: White rice can be used; reduce broth to 3 cups and cook time to 20-25 mins.)
- 4 cups (960ml) low-sodium chicken broth
- 4-5 sprigs fresh thyme
- ½ cup (120g) plain, non-fat or low-fat Greek yogurt
- ½ cup (50g) freshly grated Parmesan cheese, plus extra for serving
- 1 tablespoon fresh lemon juice
- 2 tablespoons fresh flat-leaf parsley, chopped
Equipment:
- Large Dutch oven or heavy-bottomed pot with a tight-fitting lid
- Wooden spoon
- Chef’s knife and cutting board
Instructions:
- Prep and Season: Ensure the cubed chicken is pat very dry. Season it all over with ½ teaspoon of salt and the black pepper. Dice the onion and sliver the garlic.
- Sear Chicken: Heat 1 tablespoon of olive oil in a large pot over medium-high heat. Add the chicken in a single layer and cook for 2-3 minutes per side until golden brown (but not cooked through). Transfer to a plate; set aside. (See images 2 & 3).
- Sauté Aromatics: Reduce heat to medium. Add the onion and sauté 5-7 minutes until soft. Add the slivered garlic and sauté 60 seconds until fragrant. (See image 3).
- Toast Rice: Add the uncooked rice and fresh thyme sprigs to the aromatics. Cook, stirring constantly, for 2-3 minutes to toast the rice. It should be nutty and glossy. (See image 4).
- Simmer: Increase heat to high. Deglaze the pan with chicken broth, scraping up browned bits. Return the seared chicken (and any juices) to the pot. Stir well. Bring to a boil, then immediately cover, reduce heat to low, and simmer for 35-45 minutes. Do not lift the lid.
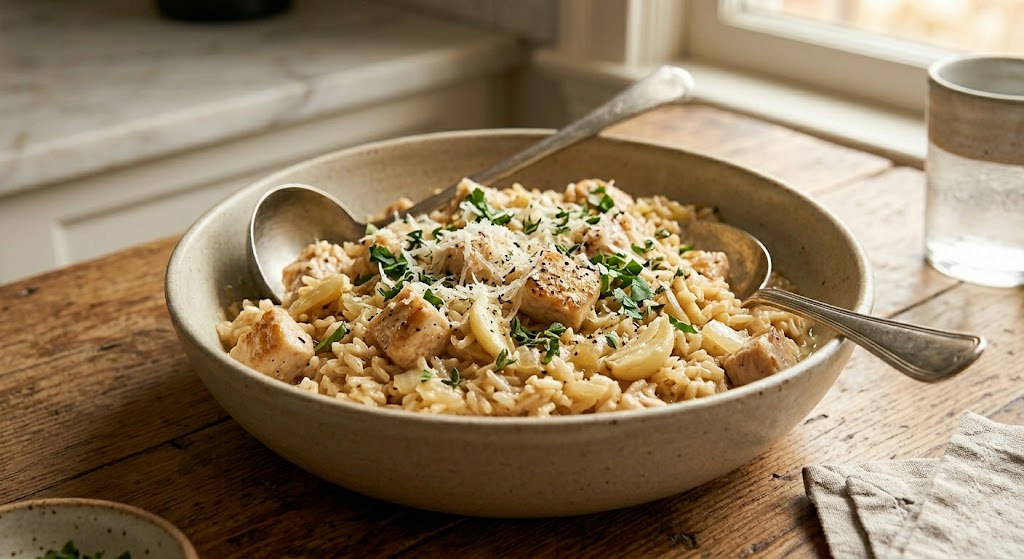
- Texture Check & Finish: Check the rice for tenderness. Remove from heat. Discard thyme sprigs. Stir in the Greek yogurt, Parmesan, lemon juice, and fresh parsley. Fold until smooth and creamy. (See images 5 & 6).
- Serve: Serve immediately, garnishing with extra Parmesan and black pepper.
Now that we’ve made this incredibly nutritious and comforting meal, let’s look at the finished result. This is a final visual payoff, showcasing the creamy texture and vibrant garnishes.